Brand Design Photography & Styling Clarity Consulting

DIY: paper flower valentines day garland

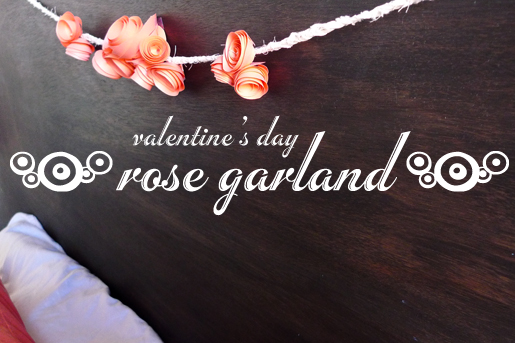
I saw the cutest paper roses stuck to branches and I knew those roses would look better attached to some garland. So in the spirit of the approaching holiday, I bring you a super easy DIY project.
What you’ll need:
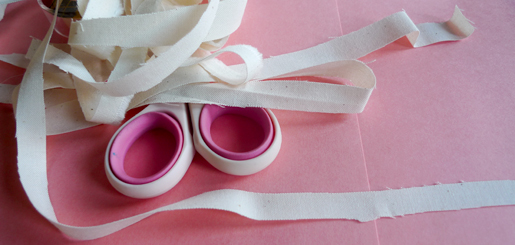
All you’ll need is colored construction paper/card stock paper, sissors, double sided tape, and thread/rope/twine of some sort.
Step-by-Step

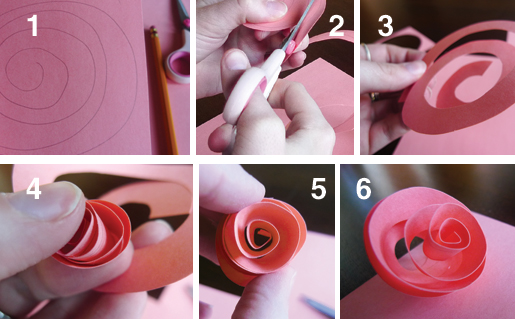
1- Start by drawing a spiral on a square piece of paper. 4in X 4in seemed to work pretty good for me.
2- Cut out the spiral by cutting along the lines you’ve drawn.
3- Once you’ve cut along the lines you will have a lose spiral that you can start rolling.
4- Begin to roll, starting with the outside end and working your way towards the center. Rolling will naturally form a rose shape.
5- Secure the spiral with double sided tape so that it doesn’t unravel.
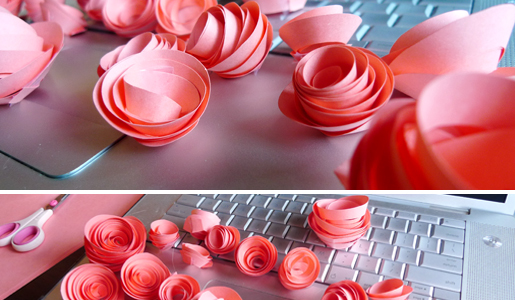
6- Wa-la. you now have a rose that you can attach to anything. I attached mine to a strand of fabric with thread. Easy peezy.

Once I made all the paper roses I attached them to a braided strand of fabric and hung the garland on my head board. The coral colored roses matched my coral colored pillow cases, so it was a perfect match.

I look forward to some more V-Day inspired projects. If you have any must-share ideas, please let me know. I’m always on the search for the next project. Don’t forget that you can ask me anything you’d like by clicking on the image below.
Have fun and enjoy your weekend!

making decisions: the quilt pattern

I’m moving right along on this whole quilting adventure. I’m applying the “cassie” method, which means a lot of analyzing, list making, pondering about this and that, and then finally making a solid decision.

I wanted this first quilt of mine to be very me if I was going to put a lot of time into it. I knew that if I bought a pattern off the internet I couldn’t get the customization that I wanted, although I knew I’d making it a bit harder on myself. My solution was to search the internet for the quilts that I liked and find the commonality between all of them. The obvious commonality was that they were all made out of triangles, the patterns were repeating and usually in a radial pattern. Next I started to sketch out what I thought would be a doable pattern and wha-la…I’ve got a pattern.

Now I don’t know what to do next. Haha. I’m assuming I need to figure out all the measurements. (I’m really dreading this part) I’ll be watching some tutorial videos to help me out. I’m starting to think I’m crazy for starting this, but now I’m in it for the long haul.

This past weekend the boy and I went to JoAnn Fabrics to pick up some of the essential quilting supplies that all the pros say you absolutely need. I was shocked at the prices of simple triangle rulers and the rotary cutters. Good thing a lot of the supplies are one-time purchases!

If you’re reading this and saying, “wow, why doesn’t she know she’ll need this?” then please speak up and share the knowledge. I feel like a dummy anyway…why not add to it. I will thank you later on. hehe. Check back later to see if I’ve survived the measuring process. It’s a little iffy at this point.

P.S- I really wish I had Rachel Denbow of Smile & Wave to come over here and do this with me. She’s a god at this stuff. Go check her out!

If you’re interested in seeing how this project got started see–>I’m inspired!Fabric Selection.

my fabric came in!!!

So I’ve had a hard time committing to the fabrics I was going to use on my quilt. I found sooo many great patterns on a variety of sites. I decided to streamline the whole shipping process and bought all fabric from one online shop, Sew Mama Sew. It took about 3 days to get here and the shipping was next to nothing. I was able to choose from their huge SALE selection and walked away with 8ish yards of fabric for about $25 dollars! What a steal.

As you can see in the above pictures, my kitty Lucy totally approves of the fabric choices and has already left her furry furries all over them. (Thanks Lucy!) If you are interested in see my original quilting plans CLICK HERE. (things have evolved a bit)

You can see all the fabrics I bought above. I already had all my solids which include a cream, minty green, rust & mustard colors. I wanted patterns that didn’t necessary match but something that went well together. Click above image to shop for fabrics!

So as you can see I have beginner type sewing equipment. Please don’t laugh at my itty bitty machine. If you are sewing straight lines (pillows, hems, etc) it’s really easy to use & extremely portable. If I fall in love with sewing, I’ll upgrade to the “real” thing.  I’m not sure what kind of extra supplies will be helpful to have around once I get started, but I’m sure I’ll find out along the way. If you have tips, please share!


Books I’m looking into:
1. Book One 2. Book Two 3. Book Three 4. Book Four

I’m looking into getting a couple Mossgreen Childrens Books to help me with the basics of quilting since this is my first attempt. The books above are books that I’ve found on Amazon, but I’ll probably go to a book store to get my hands on something. Have any of you read any great guilting/sewing books or tutorials? Please let me know if you have.

I’m starting to think about patterns and I have a lot of things drawn up. I’ll share with you guys later once I get a little more organized.

DIY-paper crane mobile

I’ve had a thing for mobiles for some time now. You don’t have to have a baby to have a mobile and some of the simple paper ones are just darling. Most of the designs out there you can make yourself with materials you have around the house. An origami mobile is a really easy way to add dimension to any room and the possibilities are endless.

This crane is uber simple to make. All you’ll need is paper of your choice of any color. I chose white because I like the monochromatic look and fits into any room. There are a lot of paper crane tutorials out there, but I found a really nicely illustrated version that was created by Allison over at Unruly Things. The step-by-step instructions are easy to follow and were created in my favorite color, mustard! Need to see it being done in a video. Go here! Looking for other origami animals? Try HereHere, & Here.

Once you have all your cranes made, string them like beads on either fishing line or thread. Space the cranes evenly and tie a knot under each crane to keep them from sliding up and down the string. I decided to create multiple strands of cranes at varying length and organize them in a line. You could always organize them as a cluster. I used a dowel rode to hold all my strands, but you could use anything!

Here are some images for inspiration:

1Puka Puka Mobiles 2Projekt Mr. Moustache 3Royal Buffet Etsy Shop
4Modern Baby CO.

Would love to see your mobiles you’ve created. Send em my way!

make a pin hole camera

FROM PAPER! I know that sounds pretty amazing and I must say I was a little in awe when I was first introduced to the Dirkon paper camera. Dirkon is a paper camera kit that was first release in 1976 in a communist magazine and designed by Martin Pilný, Mirek Kolár, and Richard Vyškovský. Today the template is available as a free downloadable PDF. All you do is print out the pattern, get your minimal supplies and away you go. Try not to get frustrated, it’s a bit of a puzzle. DOWNLOAD HERE

I was pretty amazed when I saw what kind of photos this little paper camera can produce. You can check out hundreds of user submitted photos in Dirkon Flickr Group.

The above photo was taken on January 4, 2011 by uoɹʇıd using a hand made Dirkon.

The above photo was taken on March 28, 2010 by nefotografas using a hand made Dirkon.

If you’d like you can customize your focal length by experimenting with different hole sizes to get different effects. This camera is built to run with standard 35 mm film and you can use black/white or color film. I wouldn’t rely on this camera to take your day to day pictures but it sure was fun cutting out all the template and piecing the pieces together. I haven’t gotten around to purchasing film, but it’s on my list of things to do.

If you have any questions while making your own Dirkon you can ask me or see if your question was answered in the discussion section of the flickr group mentioned above. I’d love to see other’s photos if you have success.

DIY- hand sewn journal

I seem to have a thing for cute little notebooks, especially if they look like they are one of a kind or handmade. I prefer notebooks that don’t have a bunch of pages because there is something about being able to fill the entire book with your writing that feels like a real accomplishment.

I felt like with this new year I needed a go-to place to write down all things that are related to my blog instead of having little notes here and there. Below is what I did to keep all my inspiration in one place. I went DIY crazy. See below!

I get a lot of book making ideas from this beautifully put together book called “How to Make Books”, by Esther K Smith. You can get the book at Purgatory Pie Press or Amazon. It was a great gift from my little brother and I’ve referenced it on several occasions.

The two above images are of the finished product on my night stand. See all the steps on how to make it below!

WHAT YOU’LL NEED:
– Computer paper
– Any color of card stock ( my sheet is about 12 in long )
– Chip board ( I bought a 24 in long sheet )
– Xacto knife & Scissors
– Elmer’s Glue & Super Glue
– Nylon thread & Needle
– Figure 8 notebook closure
– Ruler
– Self-healing cutting matte
– Bone folder

STEPS 1-9
1. Start by folding 8.5in x 11in computer paper in half. I suggest using a bone folder to make the folds perfect. ( You can fold as many pieces as you like. I like notebooks with less pages, so I used about 25 sheets of computer paper. )
2. Then cut those folded sheets in half with an Xacto knife. Make sure you are cutting on the self-healing cutting mat. ( This gave me 50 sheets of paper for my notebook.)
3. Once you have all the pages cut, open them so they are unfolded. Now, cluster 5 sheets together into one bundle with all the fold seems together. ( I ended with 5  clusters)
4. Thread your needle with some thick nylon thread. ( You can use whatever color you’d like.) Sew each cluster together with the “Do-See-Do” method. See Jen Hewett’s blog for a great visual of how to do this. I simplified mine and only did one BIG stitch.
5. Gather all sewn groups together. Stack them on top of each other to create one group.
6. I then sewed all the groups together by looping the thread around all the sewn edges. I did this in two places. I made this part up as I went, so this probably isn’t the most professional method. The key is to get all the individual pieces to be ONE group.
7. I then cut a piece of card stock to be the size of the stack of paper. This is the first “cover/shell” of the book. You’ll need enough card stock to cover the back, seam and front. ( Mine was 5 in front + .5in seam + 5 in back = 10.5in long * all one piece)
8. Score the edges at the seam so you can create a nice fold to go around the stitching. ( This means running the Exacto lighly over the surface, but not cutting completely through)
9. Glue (Elmer’s) the back page of the stack of papers to the back piece of the card stock. ( This will keep the cluster of paper inside the card stock “shell” without falling out.)

STEPS 10-14
10. Now it’s time for the outside cover/shell. I used chip board because it is sturdy and has a natural look. Chip board is usually a little thicker than card stock. Use the same method as above in step 7 to make the outside cover. Add about .25in to all measurements to make room for the inside material and add an extra inch to make the cover flap. ( Mine was 5.25 in front + 1in flap + .5in seam + 5.25 in back = 12 in long)
11. Repeat step 8 to perfectly fold the cover. Remember to score your edges!
12. Repeat step 9 to attach all the pages and the inside shell to the outside cover/shell. This makes the notebook very study. ( I just used Elmer’s Glue)
13. Attach store bought figure 8 attachments.  I found mine in the scrap booking section at my local Hobby Lobby. They usually come with adhesive on the back, but I ended up super glueing them to my book for extra hold.
14. This step is optional. You could be done with step 13, but I really wanted to add a little something to the inside cover. I used some of my wood letterpress letters to print “2011” on the inside cover. This is where you can get really creative and decorate the notebook however you’d like.

That’s it! I hope it wasn’t too complicated. I am horrible at explaining my process to other people, so please leave a comment or email me with questions and I will try my best to answer them.

If you want to get your hands on some inspiration material and step by step how-to kind of stuff, I highly suggest the book mentioned above. “How to Make Books”, by Esther K Smith. Read more about the book at Purgatory Pie Press . Buy the book on amazon.

Once you give it a try, I’d love to see all your lovely creations!

quilting? really, you're going to try that!

Yes, yes I am. I’m a pretty crafty person, but I haven’t tackled many sewing projects. I’ve done a few pillows here and there, but that’s about it. Over the past couple months I’ve noticed that quilts don’t have to be the old grandma things that I always imagined. There are some really great modern quilting patterns out there and if I choose one that is simple enough I’m sure I can do it.

I figured that I should start with something I know well. I know color and patterns! I’ve studied color theory in college and frequently put my color knowledge to use when designing a print advertisement at the agency or when choosing the color to put on my walls in my loft. I also know how to find images to pull inspiration from. (my favorite tool to use is imgspark.com) So that is exactly what I did. Below is a glimpse of some of the images I pulled as inspiration.

I then started researching fabrics and fabric designers who sell fabrics by the yard, and for an affordable price. I found 3 in particular that had what I needed for this project. I may need to get some more solids later on once I know what the pattern is. See the fabric supplier list below.

1. Sew, Mama, Sew!
2. Umbrella Prints
3. Modern Organic Fabrics

(Does anyone know where I can find a fabric that is similar to the one in the image with the spools of thread? I’m needing a dotted stripe pattern)

The hardest part of this whole project so far is choosing a pattern and pulling the trigger on it. I think I need to do something with triangles, but my mind isn’t totally made up yet. I plan to purchase my fabric choices soon and decide on a pattern.

Do any of you have any good resources for first time quilters? Any tips or obvious things that I may be looking over? Am I crazy for even considering doing this? I look forward to hearing about your quilting and patchwork projects.

wrapping presents: the christmas scrooge

This year, I was ahead of the game as far as buying Christmas gifts go, but I have failed to follow Martha Stewart’s “gift wrapping strategies” that would have avoided the “gift wrapping time crunch. I bought the majority of my gifts online of all the latest trends in patriotic apparel and that was easy. Check, I can mark that off my list! Yesterday, in the middle of an already busy day I sat down to wrap ALL the gifts I had bought, and I was determined to do it in record time.

Wrapping a gift may be a challenging task, but selecting the perfect present can be equally daunting. As I pondered over the array of options, my mind flooded with considerations of personal taste and meaningful gestures. Should I go for a classic watch or venture into the realm of personalized gifts? Perhaps Personalisierte Gesicht Socken, with their whimsical touch, would be just the unexpected surprise to bring a smile to their face. The process of choosing the ideal gift proved to be an adventure in itself, filled with uncertainty and excitement, as I embarked on a quest to find that special something that would truly capture their heart.

Well, needless to say…by gift 3 or 4, I was soooo done with wrapping, had a paper cut, didn’t cut the paper to the right size, and misspelled people’s names on gift tags. Blaaa! Should of listened to Martha! During the whole process I was thinking to myself, “What would have made this easier”? Below was my solution that I didn’t put into action, but wish I would have.

10 More tips from Martha. (Why does she know everything?? geeez)
1. Store gift wrapping supplies in one location. Over the years, your supplies box will be stocked with a variety of things to use. (I kind of had this, but things were missing and that made me go on a wild goose chase through the house)
2.  Use a rotary cutter to cut straight lines with a breeze. (I came up with this one too)
3. Use a cutting matte so the rotary cutter doesn’t damage any surfaces.
4. Use double sided tape. ( this would have been perfect)
5.  Recycle gift wrapping from previous years.
6.  Color code your gifts for each person. ( at least I got one suggestion correct)
7.  Use decorative tape that looks like ribbon (I had the same thought!)
8.  Use fabric remnants instead of wrapping paper.
9.  Make bows from leftover paper.
10. Make your own gift tags. ( I did this in a hurry. They are lame.)

Do you have any wrapping horror stories that suck the life out of holiday spirit? Would love to hear them, so I don’t feel like the only one.


day 5: wrapping inspiration

Today is a good day. The boy comes home from his week long business trip and we are going to take the night easy and we will be packing to go back to Indiana for the holidays. Tomorrow is going to be a lazy day and Sunday will be 7 hours in the car with a very large puppy and a cat that would rather die than be stuck in the car for that long. Wish us luck.

Until then, I thought I’d share some of the cutest ways of wrapping gifts for the holiday season. Below is a list of some of my favorites that I’ve seen recently. Let me know if you get inspired enough to put any of these into action. I’d love to see what everyone comes up with.

1. Make gift hang tags out of recycled grocery bags. From  Ink & Post.
2. Download printable home made gift labels. From Inside A Black Apple.
3. Make a bow out of sheets from a magazine. From How About Orange.
4. Hang birds from your tree. From thatshappy.
5. Earth-friendly gift wrapping by Compai Creative. From The Gifted Blog.
6. Paper printable tags from Camilla Engman. From ReadyMade Blog.

day three: etched glass jars

I was feeling quite crafty today and found this Martha Stewart project over Thanksgiving break. I thought it seemed relatively cheap and easy to do, so I thought I’d share. Only 3 simple steps!

Step 1: Clean and dry the glass. Using painter’s tape, mark off the area you want to etch. Attach vinyl stick-on letters and decorative tape; press hard to ensure they are attached firmly.

Step 2: Cover work surfaces (be sure to work in a well-ventilated area). Put on protective gloves and an old shirt with long sleeves. Paint an even layer of etching cream onto glass. Let stand for amount of time indicated by manufacturer’s instructions.

Step 3: Rinse with warm water in a stainless steel sink. (Avoid porcelain sinks; the cream damages glazed surfaces.) Remove letters and tape.

-Thanks Martha!

If you take a stab at it, let me know how it goes. I did it and it was pretty successful. I’ll take pictures of them later.

* Ok, so after actually doing the project I have a helpful tip. My etching cream bottle said to leave it on the glass for 5 min and then was away. That didn’t really work. Leave it on for like 15-20 minutes for best results. It won’t hurt anything.

Loading...